
One of the columns in the Person table, “Skill Level” is currently a number. We should convert that to a Global Option Set.
Reminding ourselves of the requirement:
Solution that will connect learners and experienced speakers of a language, considering levels of skill and preferred communication methods to facilitate time-bound meetings which must be paid for by the learner.
When converting data between types, in this case from a whole number to a Global Option Set, you must consider the existing data and any dependencies on it.
- Existing data will likely need to be retained or at least migrated to the new format.
- Users may have built up a dependency on the field that is not immediately obvious.
In order that we smoothly transition to the new data type, we’ll run through some steps:
- Create a new field for the data and rename the old field to avoid any confusion.
- Migrate data into the new field from the old.
- Replace the field in any Forms, Views, etc. that depend on the old field.
- Delete the original field.
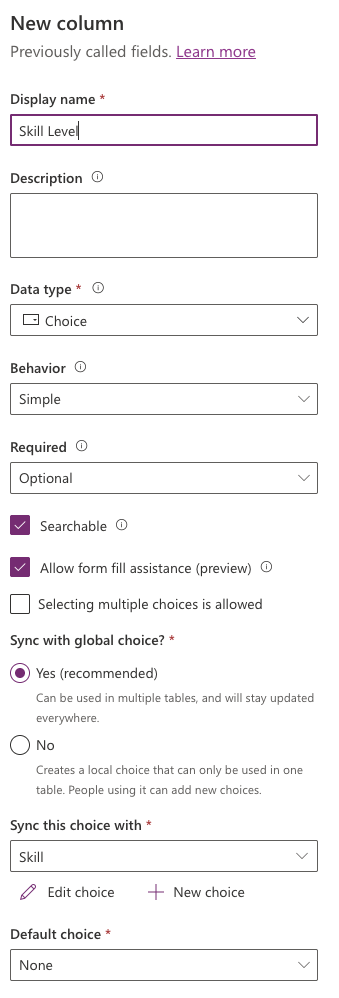
Create a new field
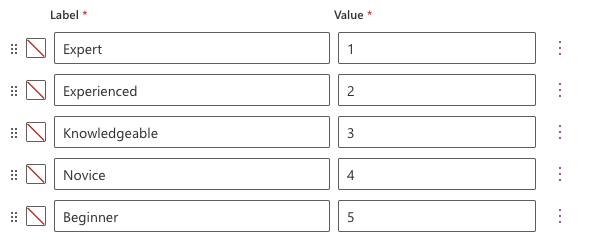
We’ll create a new field for the Skill Level with common values, eg.
- 1 – Expert
- 2 – Experienced
- 3 – Knowledgeable
- 4 – Novice
- 5 – Beginner
This will improve on the current Whole Number data type, where numbers can be between 1 and 5, but could be any number! Of course, we could apply validation on this field but that’s hardly user-friendly; it punishes the user after making an incorrect selection instead of guiding them to a successful selection.
We’ll use an Option Set either a standard or Global Option Set.
| Feature | Option Set | Global Option Set |
|---|---|---|
| Scope | Limited to Table. Changes do not affect other Tables. | Spans the Dataverse. Changes to options affect all selections. |
| Changes | Changes are specific to the Table | Changes are global, useful when correcting typos. |
We’ll use a Global Option Set, using a Table already created, called Skill. This includes the skills outlined above:
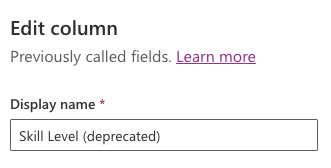
A problem with this approach is that the Schema name and Logical name don’t line up with the Display name. When creating the new field, ensure the Schema name has been changed to avoid an error such as:
An attribute with the specified name njp_SkillLevel already exists for entity njp_Person.
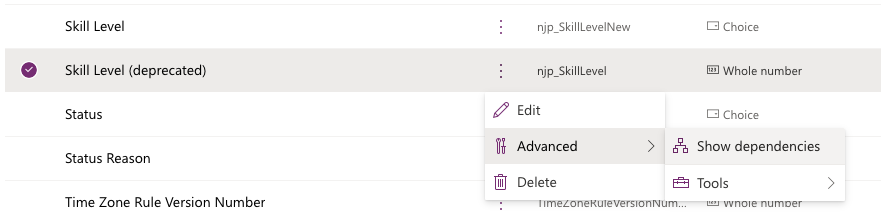
In order that we don’t get confused and delete the wrong field (!), rename the current field’s display name:
Migrate data into the new field from the old
One would assume that we don’t want to lose any data when migrating from one data type to the other. We need to choose a strategy of data migration.
| Excel Export/Import | Flow | |
|---|---|---|
| Execution | Once, after publishing, in Production. | Once, after publishing, in production. |
| ALM integration | Not integrated, suggest 4-eyes check whilst performing. | Flow can be promoted as per usual process between environments. |
| Documentation | None. Any documentation relies on existing internal processes. | The Flow shows what should happen and when it was run, along with status. |
| Licence requirements | Excel licence | Power Automate licence |
| Maximum number of rows | 1,000,000 | 5,000 |
Excel export/import
In order to perform an Excel export/import, three steps must be performed:
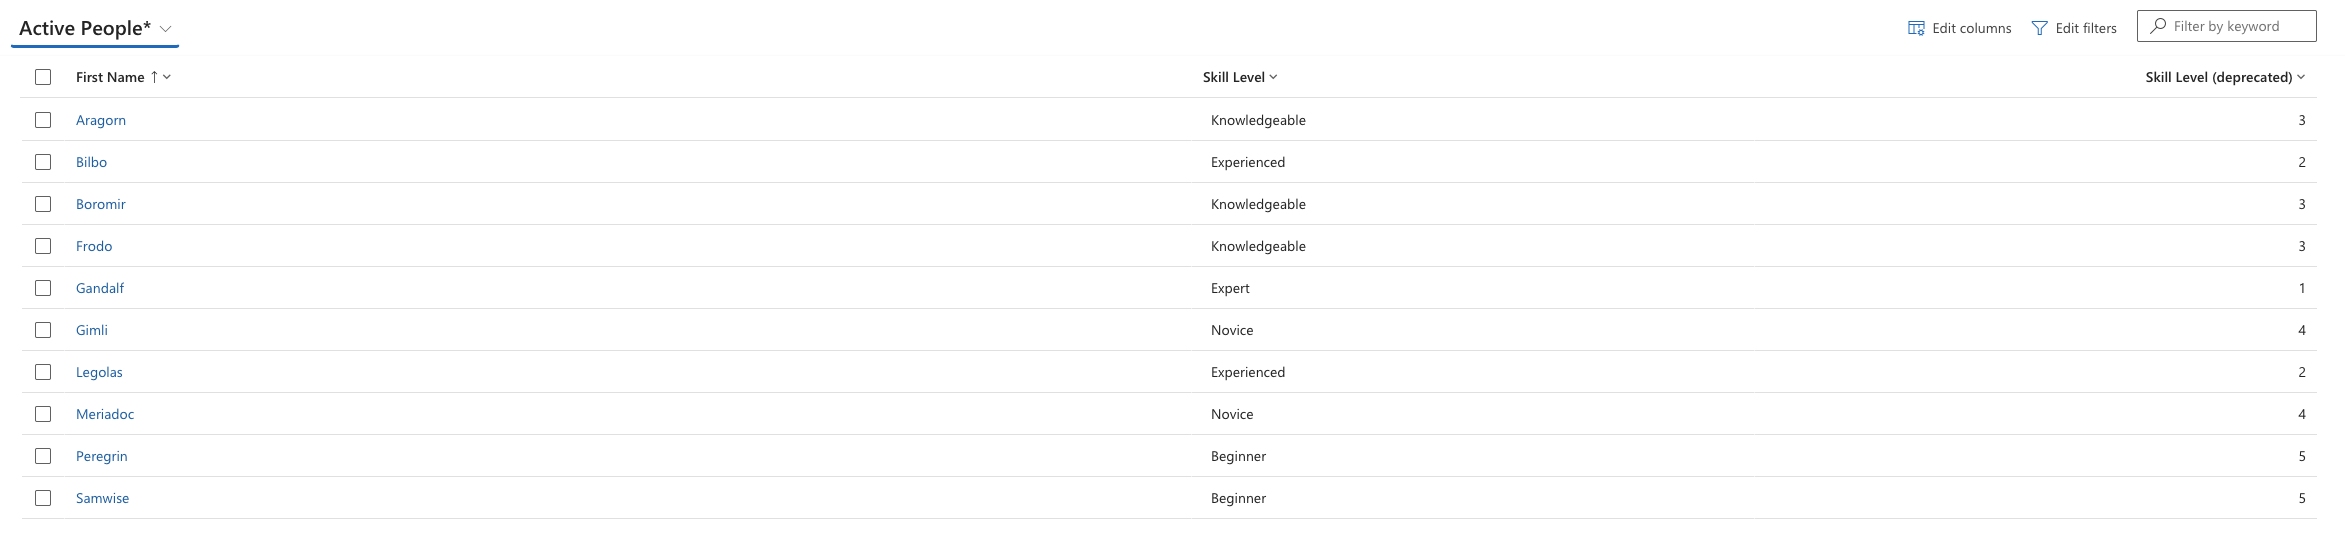
- Create a View that is filtered on the rows you require and contain the columns you would like to set. For this example, you should include the Skill level and Skill level (deprecated) fields.
- Export from the View into an Excel spreadsheet. Within Excel, modify the data. In this example, you should set the (currently empty) Skill level column with values from the Skill level (deprecated) field. Remember you cannot use formulae. When setting the field value for the new column, use the values in the existing Option Set:

- Import the modified Excel spreadsheet back into Dynamics.
Flow
Alternatively, you can write a Flow that:
- Iterates through each Person
- Sets the new field to the appropriate value
Replace the field in Forms and Views
Before the field can be deleted, it should be removed from any dependent components, such as Forms and Views.
Dependencies can be identified using the Ellipsis > Advanced > Show Dependencies option in the Tables > Columns page.
In this screenshot, we’ve replaced the old field with the new.

Delete the field
Once the field has been released, it can be deleted from the next release. However, one must make sure the new field has the correct data populated and has ben appropriately consumed by any Forms, Views, etc.
In order to delete the field from a subsequent release of a Solution, create a Clone of the Solution and delete it from there, releasing this clone.
More in this series
As I go through this, there are more posts which I’ve created.

Leave a comment